Conversion of the car ramp for a different loading sill height
Starting point: large configuration
Conversion to medium configuration
 | Loosen two M6 x 20 mm screws to separate the base from the hinge. |  |
 | Screw the base back onto the hinge. To do this, you will need all the parts removed in the first step. For the middle configuration, screw the base onto the hinge in the middle position. Make sure that the hinge is aligned parallel to the base. Tighten the screws with a torque of 4.7 Nm. |  |
Conversion to small configuration
| Loosen the two M6 x 20 mm and the two M6 x 12 mm screws to separate the hinge, base and head. The hinge is not needed for the small configuration. | 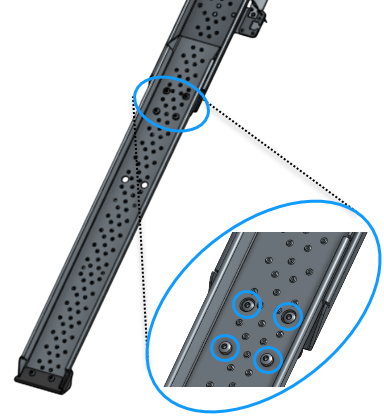 |
| Four M6 x 16 mm screws, four M6 all-metal lock nuts and six M6 washers are required to screw the base to the head. At the bottom position, one washer must be placed between the base and the head for each screw. Tighten the screws firmly with a torque of 4.7 Nm. |  |
Starting point: medium configuration
Conversion to large configuration
| Loosen two M6 x 20 mm screws to separate the base from the hinge. |  |
| Screw the base back onto the hinge. To do this, you will need all the parts removed in the first step. For the large configuration, screw the base onto the hinge in the top position. Make sure that the hinge is aligned parallel to the base. Tighten the screws with a torque of 4.7 Nm. | |
Conversion to small configuration
| Loosen the two M6 x 20 mm and the two M6 x 12 mm screws to separate the hinge, base and head. The hinge is not needed for the small configuration. |  |
| Four M6 x 16 mm screws, four M6 all-metal lock nuts and six M6 washers are required to screw the base to the head. At the bottom position, one washer must be placed between the base and the head for each screw. Tighten the screws firmly with a torque of 4.7 Nm. | |
Starting point: small configuration
Conversion to large configuration
| Loosen four M6 x 16 mm screws that connect the base to the head. |
| |
| Screw the hinge to the head with two M6 x 12 mm screws and two M6 all-metal lock nuts. Make sure that the hinge is aligned parallel to the head. Tighten the screws with a torque of 4.7 Nm. | 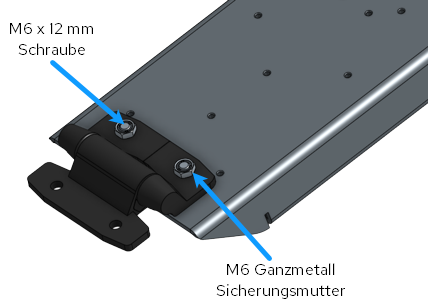 | |
 | Screw the base to the hinge. This requires two M6 x 20 mm screws, two M6 washers, two M6 all-metal lock nuts and a hinge support (blue component in the image to the side). For the large configuration, screw the base to the hinge in the top position. Make sure that the hinge is aligned parallel to the base. Tighten the screws with a torque of 4.7 Nm. | |

Conversion to medium configuration
| Loosen four M6 x 16 mm screws that connect the base to the head. |
| |
| Screw the hinge to the head with two M6 x 12 mm screws and two M6 all-metal lock nuts. Make sure that the hinge is aligned parallel to the head. Tighten the screws with a torque of 4.7 Nm. | | |
| Screw the base to the hinge. This requires two M6 x 20 mm screws, two M6 washers, two M6 all-metal lock nuts and a hinge support (blue component in the image to the side). For the middle configuration, screw the base to the hinge in the middle position. Make sure that the hinge is aligned parallel to the base. Tighten the screws with a torque of 4.7 Nm. | |